Posts

Showing posts from July, 2017

Micro:bit with Servo Motor

Image
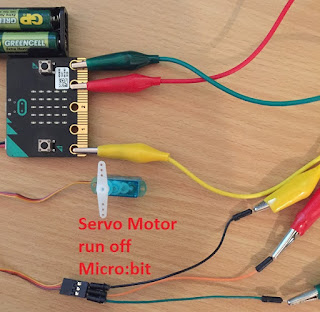
The above image shows a Micro:bit hardwired into a servo motor which is just about its limit. Block Editor Coding: Servo Connection example: Connecting The BBC micro:bit To The Servo: The servo has a three wire connector. The brown wire is ground, the red wire is positive and the orange wire is the signal wire. The BBC micro:bit will send instructions to the servo from the P0 pin via the servo's signal wire. Push the BBC micro:bit into the Breakout Board or use alligator clips. Use the 3 x  Jumper wires  and 3 alligator clips to connect the Servo to the micro:bit, the table below shows how the connections are made. BBC micro:bit  to Mini Servo 3V Pin.   connects to Red servo wire GND.  connects to Brown servo wire P0 Pin. connects to Orange servo wire More information may be found at:  https://www.kitronik.co.uk/blog/using-bbc-microbit-control-servo/

Micro:bits Morse Code Using Radio

Image
The above image displays a DASH when the Button B is pressed on another micro:bit using the radio ability of the micro:bit. The coding below is for a Morse Code Transmitter and a Morse Code Receiver. Radio waves are used for the communication. ======================================= Morse Code Transmitter: ======================================= # Language: Python     Transcribed by: Steve Madsen # The microbit can make use of radio waves # This coding needs to be compiled to one of # two microbits. Both need their own power supply # This coding is for the microbit transmitter from microbit import * # import the radio module import radio # turn radio on radio.on() while True:   # if the button_a was pressed   # send the string 'dot'   if button_a.was_pressed():     radio.send('dot')   # if the button_b was pressed   # send the string 'dash'     if button_b.was_pressed():     radio.send('dash') ===========================

Micro:bits Radio Temperature Sensor Display Python Coding

Image
The above image shows 5 degrees C being displayed after the Sensor micro:bit was placed in a freezer. The following Python code was written in the Mu editor. You compile the coding to two separate micro:bits that have power. Place the sensor into a freezer or on an ice pack and watch the temperature change making use of radio waves for communication. This coding needs to be compiled onto the sensor micro:bit: ============================================= # Language: Python     Transcribed by: Steve Madsen # The microbit can make use of radio waves # This coding needs to be compiled to one of # two microbits. Both need their own power supply from microbit import * # import the radio module import radio # turn the radio on radio.on() while True:   # the temperature of the microbit   # is stored in a variable called temp   temp = temperature()   # send to the second microbit a   # string of the the variable temp where it   # will display

Micro:bits Firefly Python coding

Image
The following Python code was written in the Mu editor. You compile the coding to three or 4 separate micro:bits that have power. Push the A Button on one of the micro:bits and the others will flash at different times. # A micro:bit Firefly. # By Nicholas H.Tollervey. Released to the public domain. import radio import random from microbit import display, Image, button_a, sleep # Create the "flash" animation frames. Can you work out how it's done? flash = [Image().invert()*(i/9) for i in range(9, -1, -1)] # The radio won't work unless it's switched on. radio.on() # Event loop. while True:     # Button A sends a "flash" message.     if button_a.was_pressed():         radio.send('flash')  # a-ha     # Read any incoming messages.     incoming = radio.receive()     if incoming == 'flash':         # If there's an incoming "flash" message display         # the firefly flash animation after a random short