Micro:bits Morse Code Using Radio
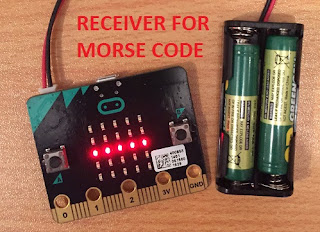
The above image displays a DASH when the Button B is pressed on another micro:bit using the radio ability of the micro:bit.
The coding below is for a Morse Code Transmitter and a Morse Code Receiver. Radio waves are used for the communication.
=======================================
Morse Code Transmitter:
=======================================
# Language: Python Transcribed by: Steve Madsen
# The microbit can make use of radio waves
# This coding needs to be compiled to one of
# two microbits. Both need their own power supply
# This coding is for the microbit transmitter
from microbit import *
# import the radio module
import radio
# turn radio on
radio.on()
while True:
# if the button_a was pressed
# send the string 'dot'
if button_a.was_pressed():
radio.send('dot')
# if the button_b was pressed
# send the string 'dash'
if button_b.was_pressed():
radio.send('dash')
=======================================
Morse Code Receiver
=======================================
# Language: Python Transcribed by: Steve Madsen
# The microbit can make use of radio waves
# This coding needs to be compiled to one of
# two microbits. Both need their own power supply
# This coding is for the microbit receiver
from microbit import *
# import radio module
import radio
# turn radio on
radio.on()
while True:
r = radio.receive()
# if the string 'dot' received
# display the centre led
if r == 'dot':
# 0 means led is off
# 9 means led is on at brightest level
display.show(Image('00000:00000:00900:00000:00000'))
sleep(100) # show led for part of a second
display.clear() # clear display
sleep(300) # wait for part of a second
elif r == 'dash':
# 0 means led is off
# 9 means led is on at brightest
display.show(Image('00000:00000:99999:00000:00000'))
sleep(100) # show led for part of a second
display.clear() # clear display
sleep(300) # wait for part of a second
===========================================
Further Image Explanation
From http://microbit-micropython.readthedocs.io/en/latest/tutorials/images.html
Each LED pixel on the physical display can be set to one of ten values. If a pixel is set to
0 (zero) then it’s off. It literally has zero brightness. However, if it is set to 9 then it is at its brightest level. The values 1 to 8 represent the brightness levels between off (0) and full on (9).
Armed with this information, it’s possible to create a new image like this:
from microbit import *

boat = Image("05050:"
             "05050:"
             "05050:"
             "99999:"
             "09990")

display.show(boat)
(When run, the device should display an old-fashioned “Blue Peter” sailing ship with the masts dimmer than the boat’s hull.)
Each line of the physical display is represented by a line of numbers ending in
: and enclosed between " double quotes? Each number specifies a brightness. There are five lines of five numbers so it’s possible to specify the individual brightness for each of the five pixels on each of the five lines on the physical display. That’s how to create a new image.
Simple!
In fact, you don’t need to write this over several lines. If you think you can keep track of each line, you can rewrite it like this:
boat = Image("05050:05050:05050:99999:09990")


Comments
Post a Comment