Posts

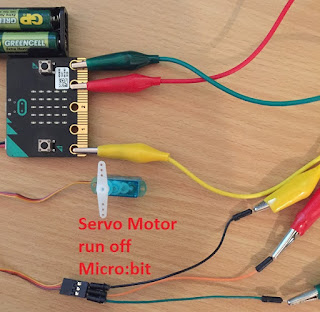
Micro:bit motor hardwired without motor board

Image
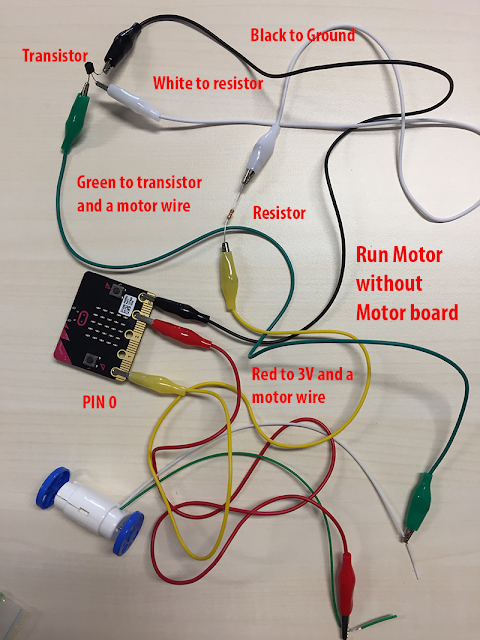
The output pins on the micro:bit can only supply a small amount of current, not enough current for a power demanding device such as a motor. A transistor can be used to solve this difficulty. A transistor is like a fence gate for electricity, a small amount of current can be used to open the fence gate to allow a lot of current to flow through to power demanding components. This is an example of building a micro:bit motor circuit with crocodile leads to join the components together. Transistor When connecting the transistor it is important to correctly identify the Base, Collector and Emitter leads. See image. Care needs to be taken when connecting the transistor to make sure there are no shorts. It is recommended you bend the pins away from each other before you connect the crocodile leads. Resistor: red, red,red, gold Microsoft has changed their URL for creating code. Go to: https://makecode.microbit.org/ and enter the following lines of code. Modify to your r

Micro:bit with Servo Motor

Image
The above image shows a Micro:bit hardwired into a servo motor which is just about its limit. Block Editor Coding: Servo Connection example: Connecting The BBC micro:bit To The Servo: The servo has a three wire connector. The brown wire is ground, the red wire is positive and the orange wire is the signal wire. The BBC micro:bit will send instructions to the servo from the P0 pin via the servo's signal wire. Push the BBC micro:bit into the Breakout Board or use alligator clips. Use the 3 x  Jumper wires  and 3 alligator clips to connect the Servo to the micro:bit, the table below shows how the connections are made. BBC micro:bit  to Mini Servo 3V Pin.   connects to Red servo wire GND.  connects to Brown servo wire P0 Pin. connects to Orange servo wire More information may be found at:  https://www.kitronik.co.uk/blog/using-bbc-microbit-control-servo/

Micro:bits Morse Code Using Radio

Image
The above image displays a DASH when the Button B is pressed on another micro:bit using the radio ability of the micro:bit. The coding below is for a Morse Code Transmitter and a Morse Code Receiver. Radio waves are used for the communication. ======================================= Morse Code Transmitter: ======================================= # Language: Python     Transcribed by: Steve Madsen # The microbit can make use of radio waves # This coding needs to be compiled to one of # two microbits. Both need their own power supply # This coding is for the microbit transmitter from microbit import * # import the radio module import radio # turn radio on radio.on() while True:   # if the button_a was pressed   # send the string 'dot'   if button_a.was_pressed():     radio.send('dot')   # if the button_b was pressed   # send the string 'dash'     if button_b.was_pressed():     radio.send('dash') ===========================

Micro:bits Radio Temperature Sensor Display Python Coding

Image
The above image shows 5 degrees C being displayed after the Sensor micro:bit was placed in a freezer. The following Python code was written in the Mu editor. You compile the coding to two separate micro:bits that have power. Place the sensor into a freezer or on an ice pack and watch the temperature change making use of radio waves for communication. This coding needs to be compiled onto the sensor micro:bit: ============================================= # Language: Python     Transcribed by: Steve Madsen # The microbit can make use of radio waves # This coding needs to be compiled to one of # two microbits. Both need their own power supply from microbit import * # import the radio module import radio # turn the radio on radio.on() while True:   # the temperature of the microbit   # is stored in a variable called temp   temp = temperature()   # send to the second microbit a   # string of the the variable temp where it   # will display

Micro:bits Firefly Python coding

Image
The following Python code was written in the Mu editor. You compile the coding to three or 4 separate micro:bits that have power. Push the A Button on one of the micro:bits and the others will flash at different times. # A micro:bit Firefly. # By Nicholas H.Tollervey. Released to the public domain. import radio import random from microbit import display, Image, button_a, sleep # Create the "flash" animation frames. Can you work out how it's done? flash = [Image().invert()*(i/9) for i in range(9, -1, -1)] # The radio won't work unless it's switched on. radio.on() # Event loop. while True:     # Button A sends a "flash" message.     if button_a.was_pressed():         radio.send('flash')  # a-ha     # Read any incoming messages.     incoming = radio.receive()     if incoming == 'flash':         # If there's an incoming "flash" message display         # the firefly flash animation after a random short
We moved premises a few weeks ago. Moving into a new place always provides opportunities for problem solving and identifying idiosyncracies of different things. After moving in, we could not oven to turn on. The oven had all the instructions for various white goods in the kitchen inside it. Not a good idea if someone could easily turn on the oven without checking. I check the fuse box and it seemed operational. After a few hours, my wife discovered a on/off switch that actually turned on the oven. Never in our lives had we seen such a setup. It must be a safety feature for young people? The new place has a couple of remote operating garage doors. Naturally, my remote control pad lost its settings and I had little or no Internet access for the first 10 days of the move. Eventually I located an Internet terminal. I did a quick search for the manufacturer of the Australian door, found a FAQ section which gave instructions on re-coding the keypad. When I took the cover off the remote co